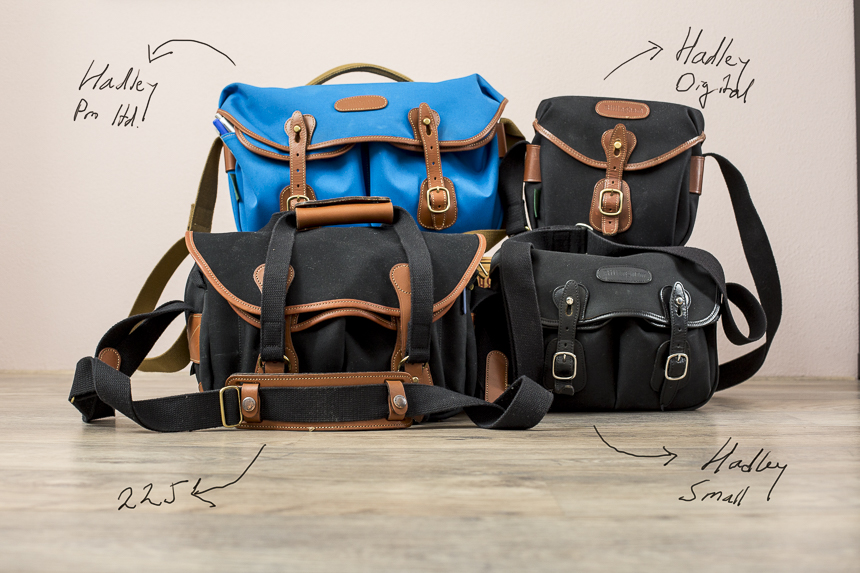
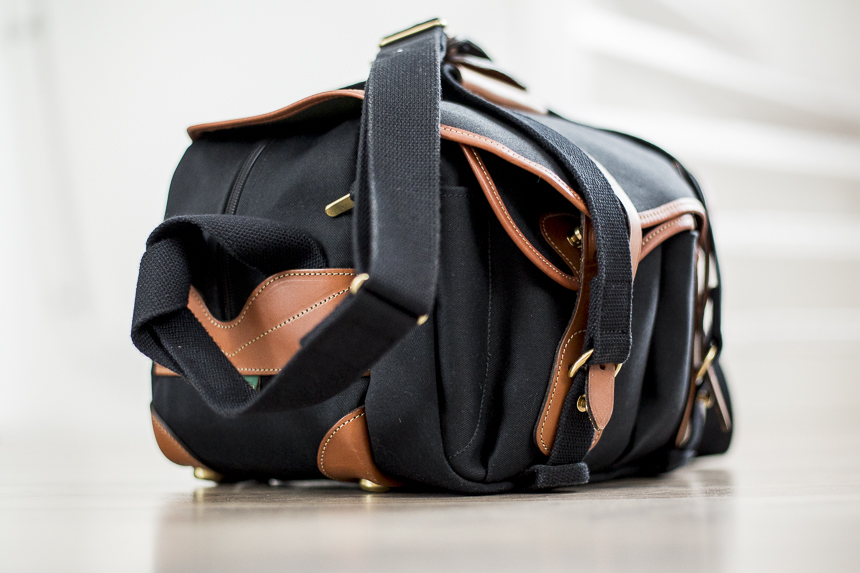
I have had quite a few photo bags in my life. In my SLR days, I had a number of Lowepro bags and I still have a few of them. When I started shooting weddings, I needed a bag that looked good and I bought a Billingham 335. Back then, Billingham was the only company that made bags that looked good enough to me. I gave the 335 to a friend of mine when I switched to Leica, but Billingham was here to stay. I tried an Artisan & Artist bag but didn’t like it enough. The zipper on top wasn’t sturdy enough and the bag was far from waterproof.
With photo bags, we’re just like women with their handbags. There is no single bag that does it all. Sometimes you need to bring a lot of gear, sometimes a little. Sometimes you need room for a sweater or a book, sometimes you don’t. Sometimes you need to be stealthy, sometimes you need to be a hipster. There is a bag for every occasion. The trick is to bring the right bag to the right job.
In the next few weeks I’ll be reviewing four Billingham bags and I’ll tell you which one I use for which occasion.
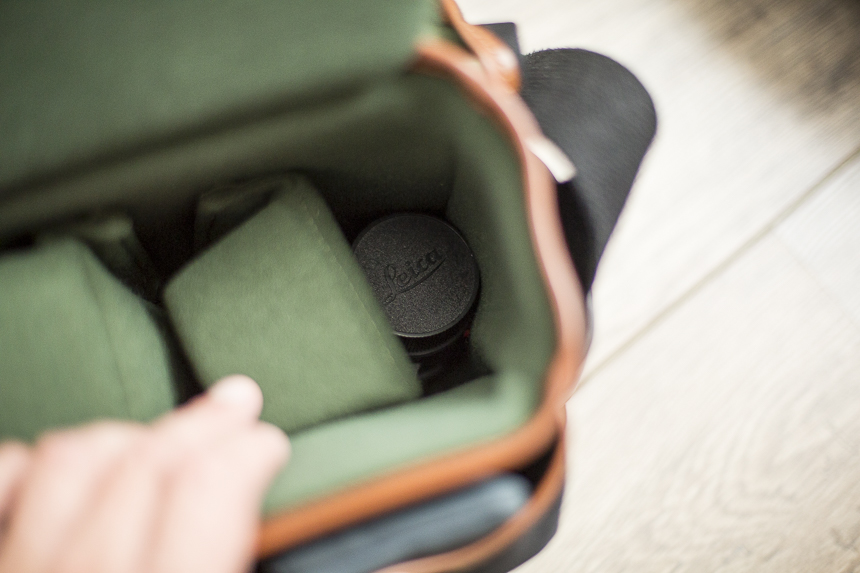
When I bought my Leica M9 in 2010, I bought this little sturdy bag in an impulse. Usually I think before I purchase something, but in this case, I got a 50% discount, because I just bought an M9. Before this moment, I only had big bags for SLR kits, so I thought that I’d need a smaller bag anyway. Back home, my wife asked me why I bought an ‘old mans bag’ with my new Leica and I almost brought it back. Luckily I didn’t. In the past four years that I have this bag, it has been very convenient in several ways. But let’s start with the specs first.
Both materials are equipped with a thin rubber ‘Stormblock’ layer…
Materials
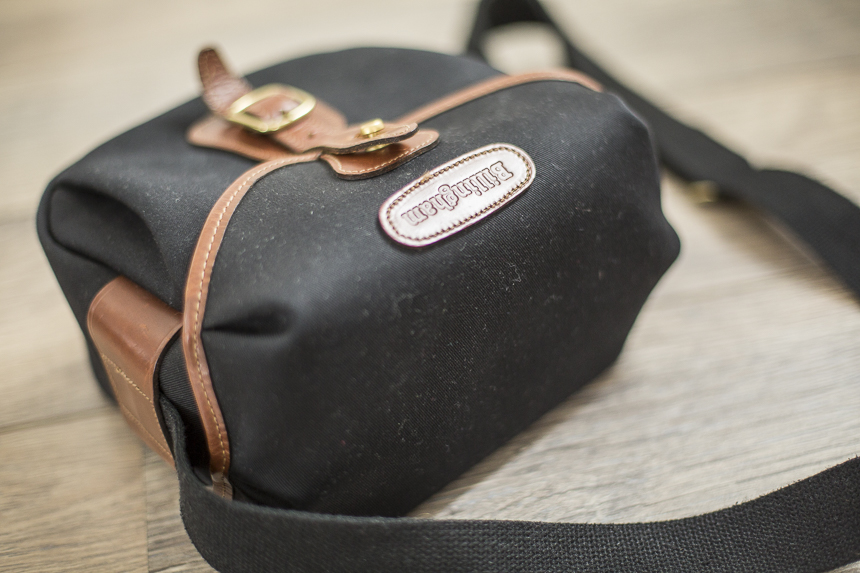
The Hadley Digital is made of either canvas, or Fibrenyte and is available in different colours. Fibrenyte is 10% lighter compared to canvas, is said to be more durable and has less colour fading than canvas. With regards to waterproofness there is no difference: both materials are equipped with a thin rubber ‘Stormblock’ layer. All my Billinghams are made of canvas and I really like the feel of the material. Also, they’re a lot better waterproof than Artisan & Artist bags and Lowepro bags – without a cover, which you’ll never use anyway -. Mine is in black with tan leather and after a few years it’s finally starting to wear in. As you can see, the material tends to attract some dust, but sometimes I don’t use the bag for weeks and I don’t cuddle it. It’s a bag you know…
The material is top notch – though mine is dusty- but still light weight
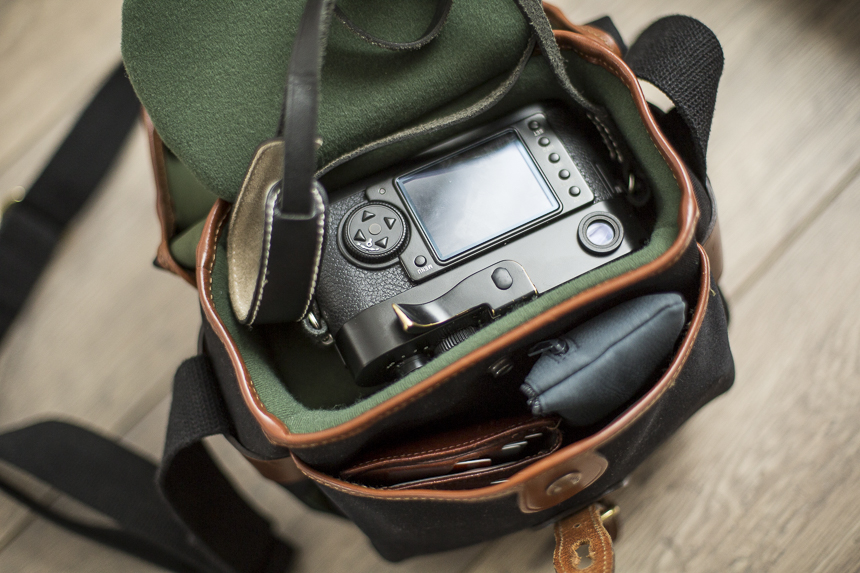
It fits a remarkable amount of gear…
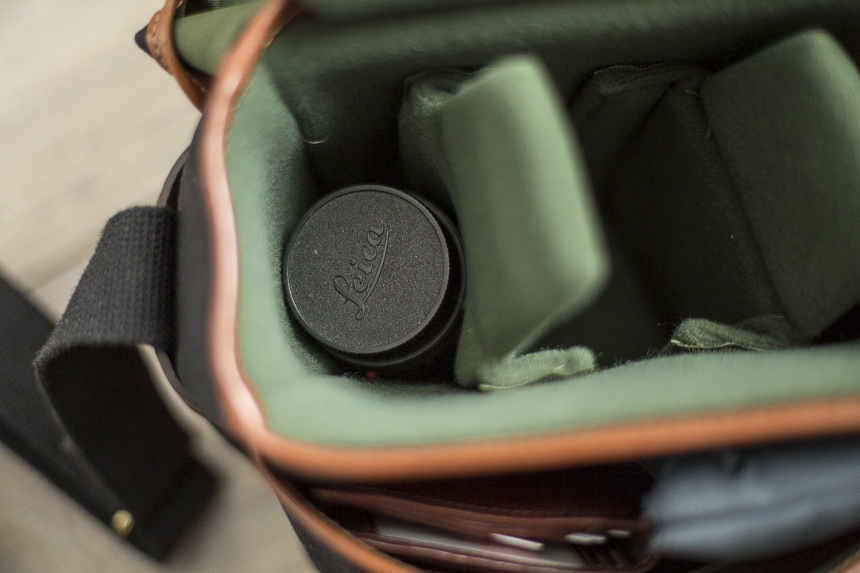
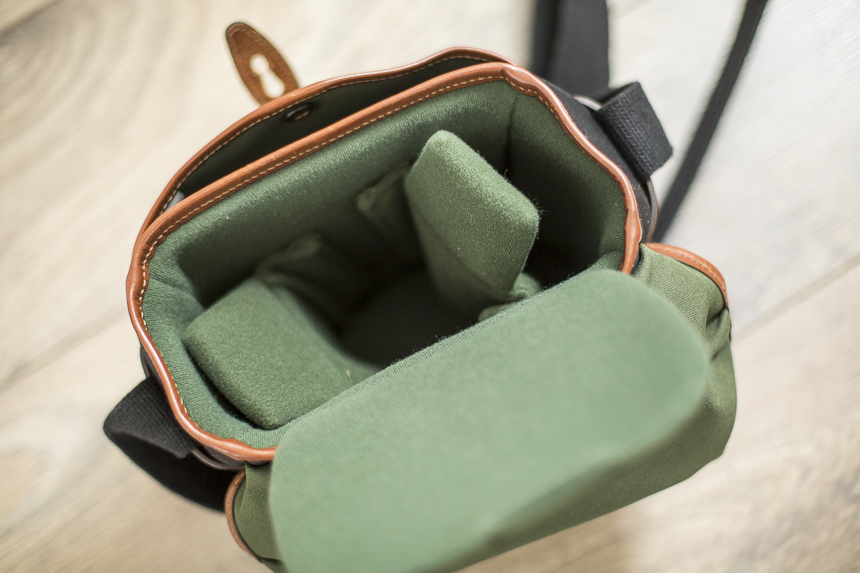
Compartments
The Hadley Digital is equipped with two compartments: one for your camera gear and one for small stuff. Although the bag looks small – and it is small – it fits a remarkable amount of gear. It fits a camera with lens attached, two other lenses and still quite a bit of smaller things. I managed to get the 75 summarit with hood attached in the bag and there’s still room for the camera with lens to put on top. On the other side of the bag I fitted the 28 elmarit and if you’d want to, you could stack another lens on top. Or keep your batteries in there.
A 75 summarit with hood attached fits in the bagAnd on the other side I put the 28 elmarit. You could stack another lens on it.And here is the M9-P with the CV 40/1.4 on top. Easy access!
The Hadley Digital in use
The Billingham Hadley Digital is a versatile bag. It’s very convenient for a short day trip if you need nothing else than a camera, a few lenses and your wallet. Weighing less than 500 grams it’ll be light enough to carry it around without hurting your back and shoulders, yet three lenses is usually all you need. However, if you need to carry a few extra things, for example a jacket or a bottle of water, the Hadley Digital is too small. For me, the Hadley Digital is perfect for a walk or for visiting friends or family. I like to bring my camera everywhere I go and I want to bring it in a bag. As soon as I need to bring more, I’ll take my Hadley Small. If needed, you can expand the Hadley Digital with the Avea 3 and 5 pouches.
The strap is adjustable in size and is wide enough to distribute the weight evenly. If that’s not enough, you can add the Billingham SP40 shoulder pad.
This canvas will get your gear through some serious rain, while it’s still accessible…
So why pay 180 Euros for a bag that does the same as a Lowepro bag that costs less than one third of this Billingham? Well, there are some features of Billingham that I like and do not find – in that combination – in other bags. First, I don’t like zippers and velcro. Billingham uses its own unique system for closing and opening the bag: it’s silent, secure and will last. Second: waterproofness. I don’t like seperate raincovers and I don’t like plastic. This canvas will get your gear through some serious rain, while it’s still accessible. Third: it fits a rangefinder. Not so many bags have the right dimensions to adequately fit a rangefinder camera. This one does. In fact, don’t even try to squeeze a 5D3 in. It won’t fit.
The interior is customizable, except for the top flap.Yes, this all easily fits. Quite a complete kit for a day of shooting.
the 35 cron is about all you need when you need a fast, lightweight and small lens…
Yes, I know. It’s still a rumor, but it might be true. They say that this Photokina, Leica will present a new 35 summicron. The current version, the first aspherical 35 summicron has been in production since 1996. That seems long, but the 50 cron has been in production since 1994 and hasn’t been updated. Unless you consider the APO 50 cron the update of course. As far as I’m concerned, the 35 cron is about all you need when you need a fast, lightweight and small lens which you can shoot anything with. I can’t be exact, but I have shot several ten thousand images with this little lens and it’s a reliable performer. I’ll do a proper review in the near future, but for now, I’ll leave you with a picture that shows its bokeh and rendering. Just lovely!
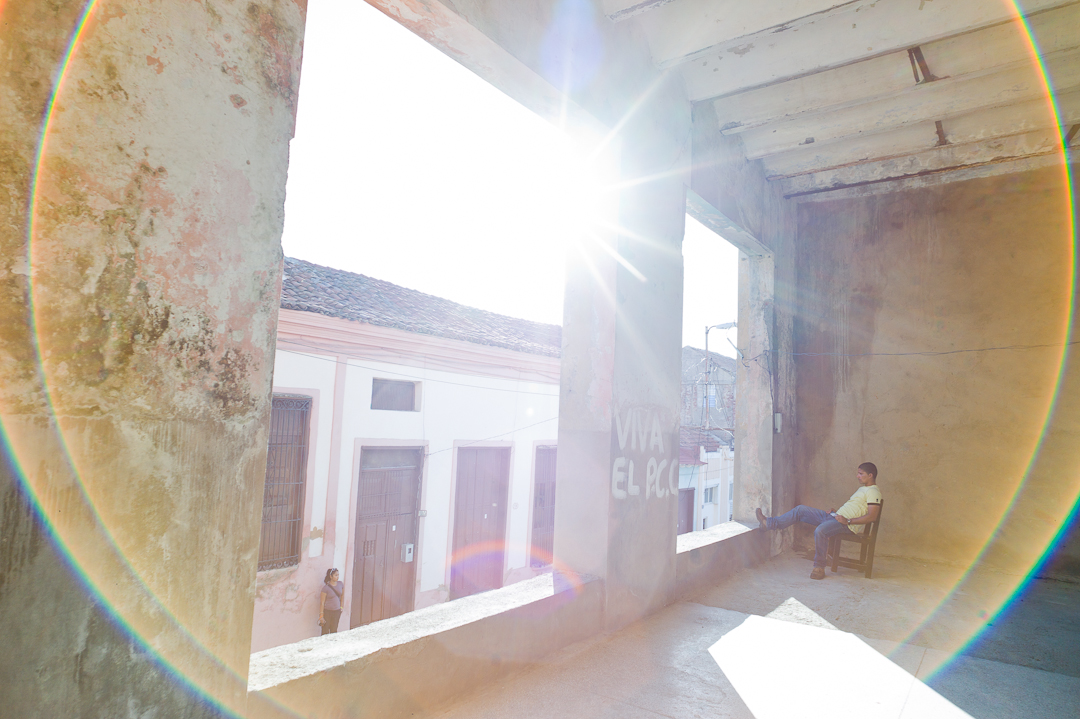
Last week, you could read my review of the Voigtländer color-skopar 21/4. I explained that I use this lens for group shots in tight spaces, when my 28mm is too long. However, there are more and better reasons to buy a 21mm for your rangefinder camera. During the time that I was a writer and photographer for an alpine climbing magazine, I learned that a wide angle can add existing drama to a picture, that otherwise would not be conveyed to the viewer. I’m not a fan of using ultra wide angles in ‘ordinary’ situations to create drama that isn’t actually there. In my opinion, if you do that, it’s just a trick. Let me show you what I mean.
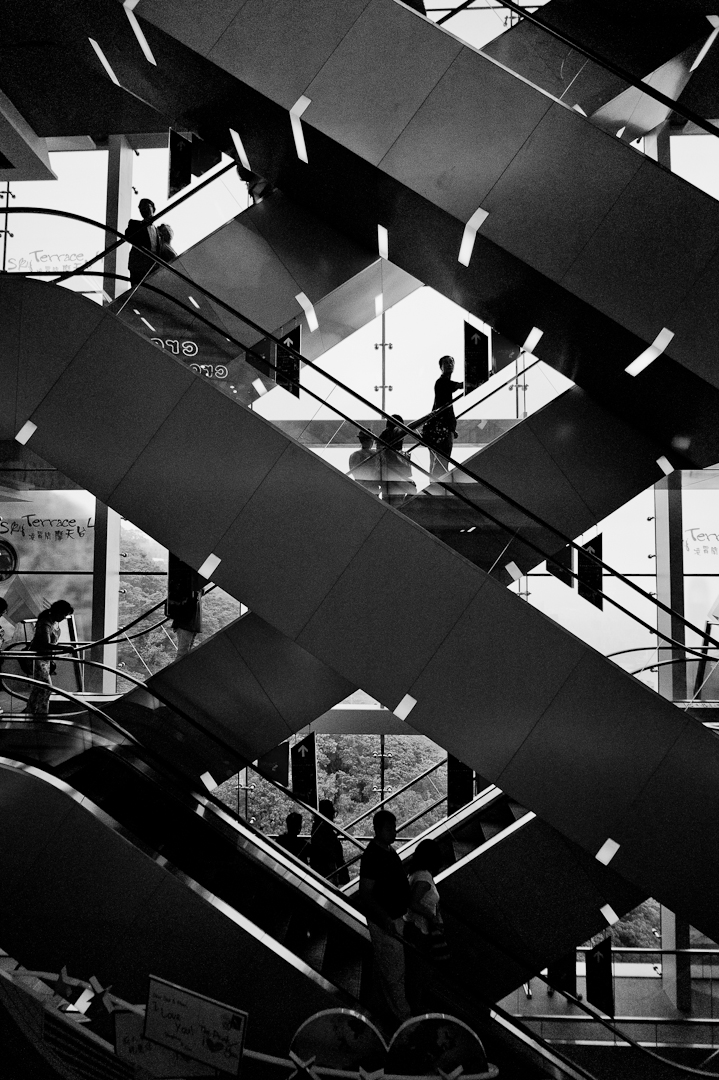
1: Get more in your frame in a tight space
Get more in your frame in a tight space. Hong Kong, Victoria.
Sometimes a 35mm, or even a 28mm can’t capture the things you’re seeing. For example in this picture, taken in Hong Kong, I noticed the impressive escalators with all these people on it. I wanted a shot with as much escalator as possible and with people as silhouettes in the frame. I mounted my 21mm, composed through the external viewfinder and there it is. Exactly what I wanted.
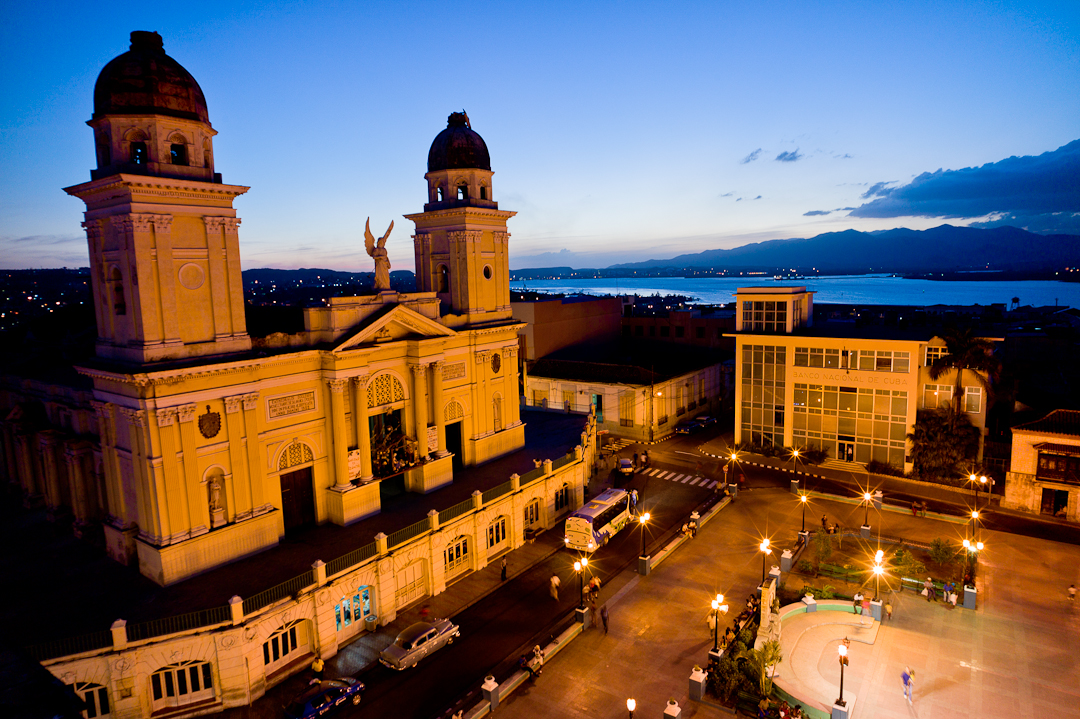
2: Architecture shots that show it all
A 21mm gives you just a little extra reach for great architecture shots. Here in Santiago de Cuba.
So there I was, having a Cuban mojito on a roof terrace and when the sun went down I thought I’d take a shot of one of the most characterizing buildings of Santiago. With a 21mm, you can get pretty much everything in your frame, while it doesn’t distort as much as the real ultra wide angles. Of course, I used a very small table tripod for this shot.
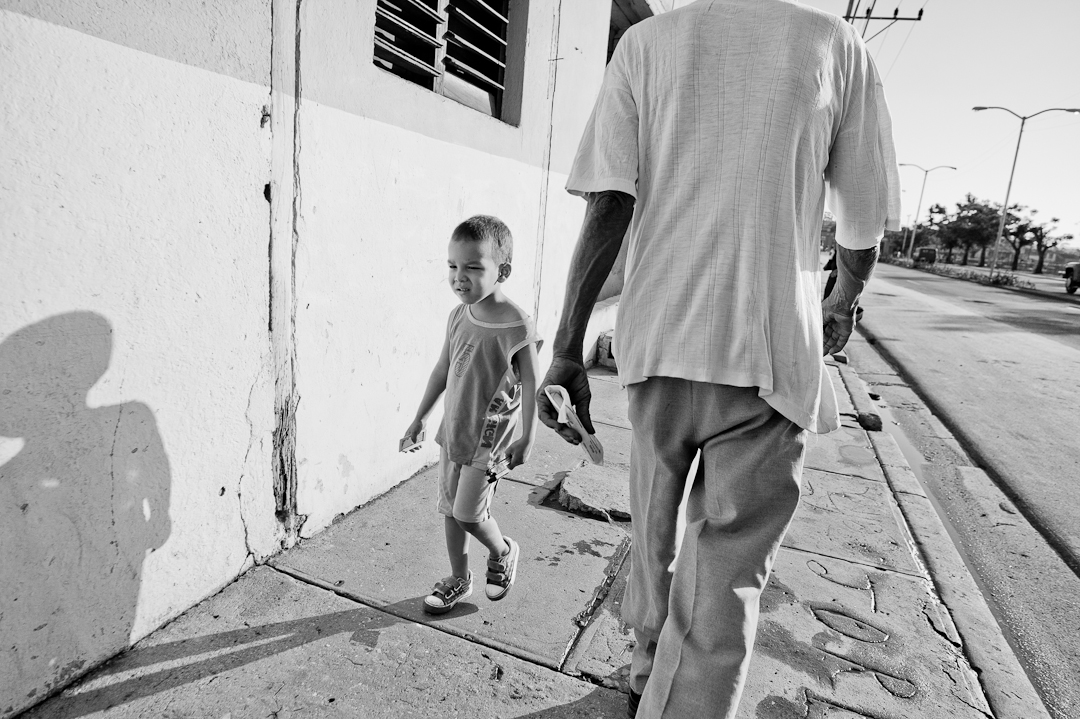
3: Shooting from the hip
Shooting from the hip sometimes delivers unusual images.
Shooting from the hip can result in interesting pictures. Maybe the picture above is interesting because it was taken from the same height as the little boy would have taken it. Anyway, with a 21mm you have a better rate of succes when you’re composing without looking. To me, I feel more ‘drawn’ into the picture than I would have been with a 35, or 28. But that’s reason number 4.
4: Get drawn in to your pictures
A wide angle creates the feeling that you’re drawn into the pictureI
It is not without a reason that wide angle lenses are very popular among photojournalists. One of the reasons is that wide angles have the ability to drawn the viewer into the image. It’s like you were there. Long lenses have the opposite effect: it feels like you’re watching from a distance. The amount of involvement with the subject is bigger with a very short lens. Sometimes this can be very useful.
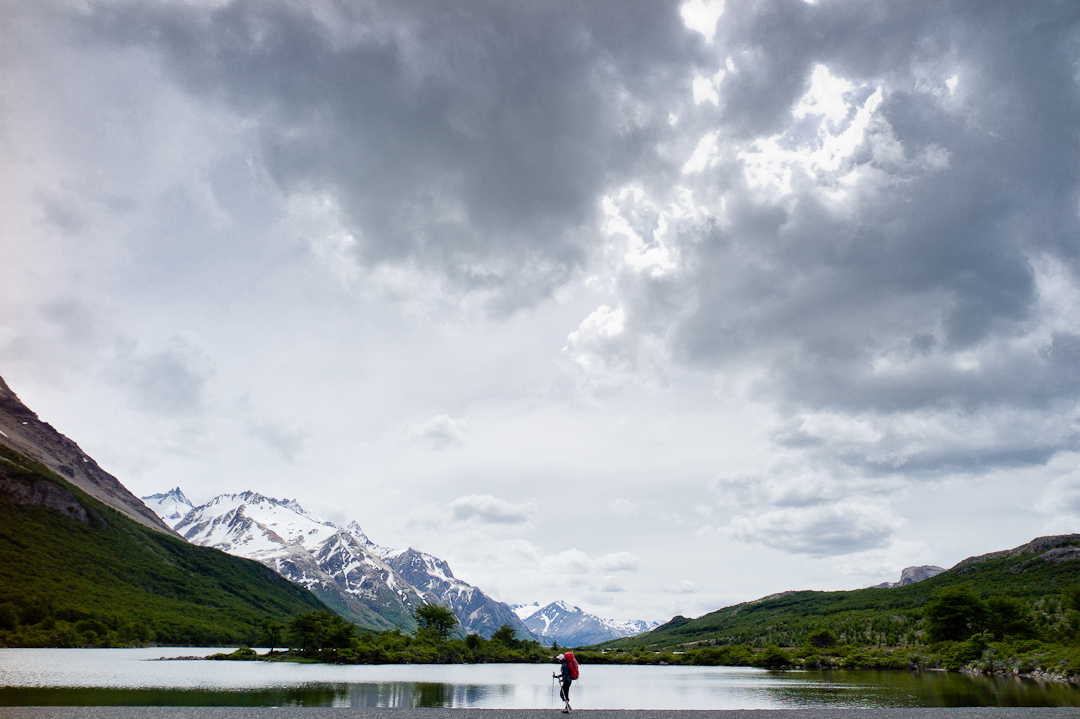
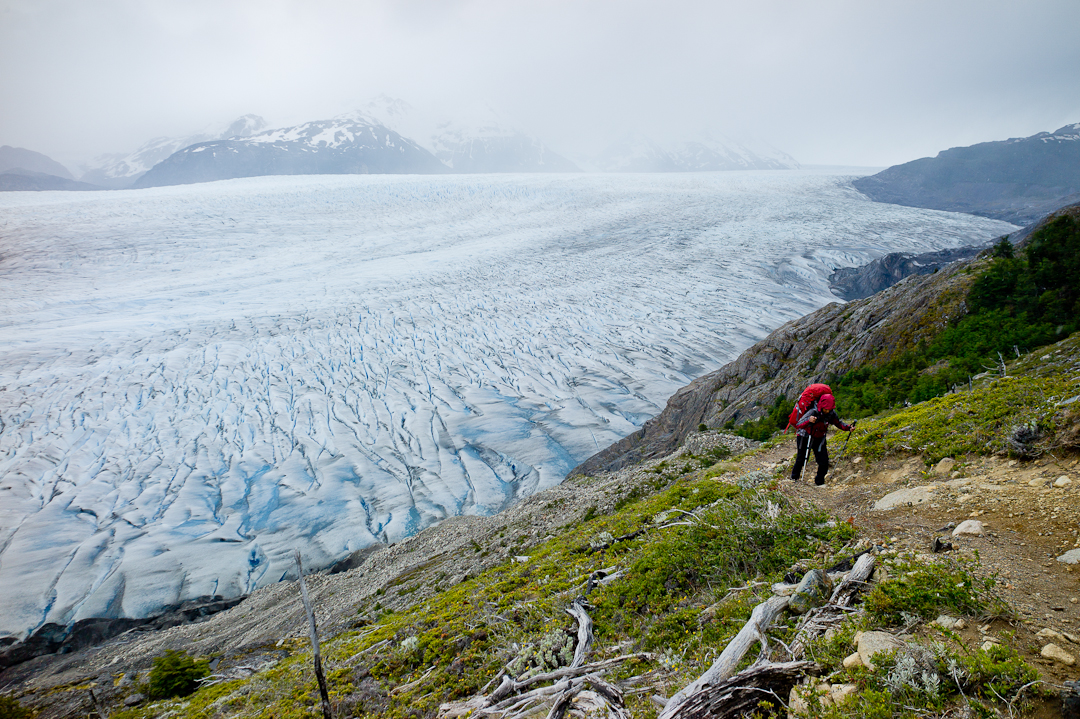
5: Show the grandeur of a scenery with a few less millimeters
In outdoor sports photography, sometimes you need a little less mm’s to show the grandeur of the scenery.
Here we are in Argentina, in the magnificent area calles Los Glaciares. We’re hiking for a few days and we’ll be camping near the most impressive mountains in the world. Here, we come across a beautiful lake and while my wife walks along the shore, I take this shot with my 21mm, showing the viewer how tiny human beings can be. Here, a lens without much distortion helps in keeping the straight lines straight. Luckily, you don’t need a Leica lens for that.
6: Include people in a shot, without making them aware
You think you need at least 50mm for a street portrait. Think again…
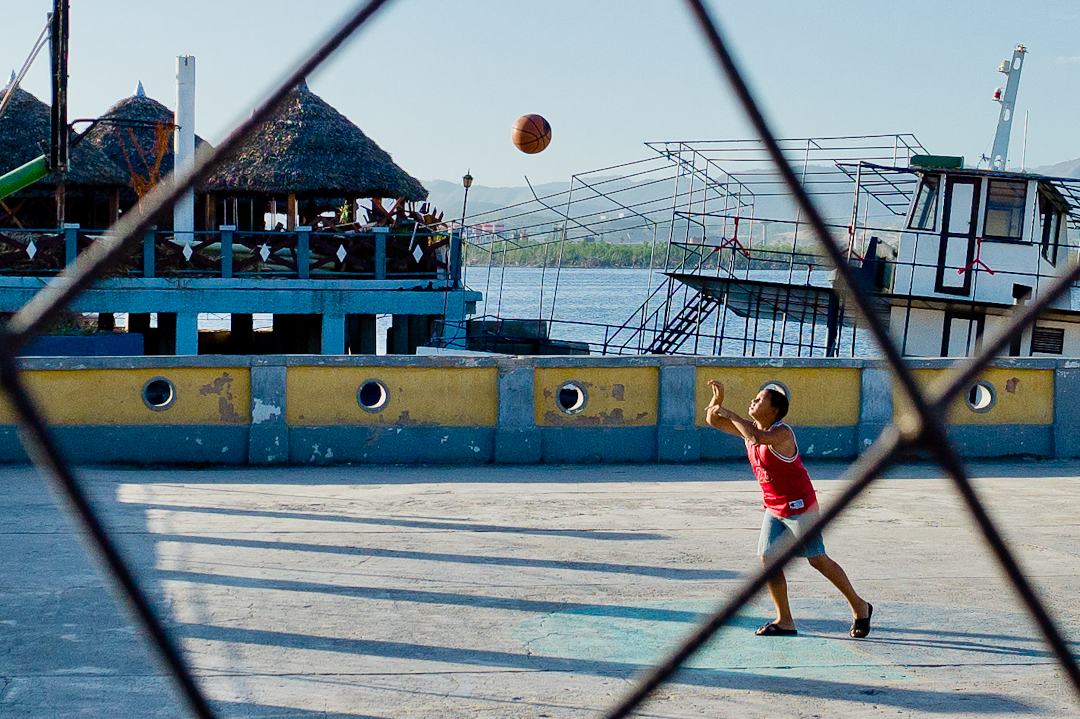
It seems logical that you’re more likely to attract attention the closer you get to people. Unless you’re pretending that you’re zooming in on something far away. Without making any eye contact with this man, I stood less than two meters away and made this shot. True, the wide angle is starting to show some funny artifacts now, but I don’t care. For street photography portraits, a 21mm can really work.
Of course there are more reasons to use a 21mm. Rangefinder photographers sometimes tend to shy away from lenses that work with external viewfinders, but I hope I convinced you to give it a try. Finally, a few more shots that I took with my 21mm.
Perfect for street shooting where you want to include lots of the surroundingsLots to include in your frame…Showing more of the natural grandeur of this beautiful glacier in PatagoniaSidney in the early evening…
Want to learn more about rangefinder photography? Check out my workshops and e-book
When I changed to my leica set, I wanted to use as little lenses as possible. I had gotten sick and tired of my DSLR kit and I would not make the same mistake of buying too many lenses for my M9 again. Also, I didn’t want any extreme lenses, on both the wide angle and tele side of the lens spectrum. Today I shoot most of my wedding work with 35 and 50mm lenses. I use a 75 and a 28 for some occasional shots that are hard to take with the other lenses, but that’s about it. Although I’m a puristic documentary wedding shooter, some couples want a shot of the wedding guests and I think that’s fair. It only takes a few minutes and after that, I change to my role as the ‘observer’ and continue with my work. On most occasions I take this shot with my 28mm, or – depending on the size of the group and the space we have – with my 35mm. Sometimes there just isn’t enough space to get them in my 28mm frame and for that reason I bring my tiny 21/4 lens, made by Voigtländer.
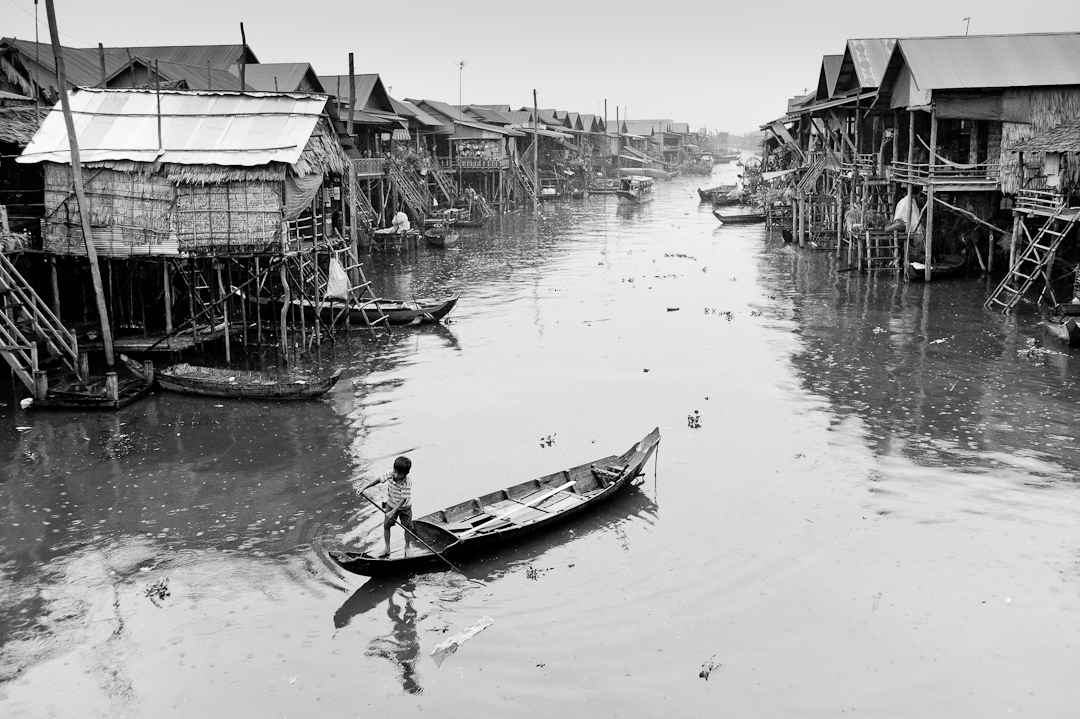
The CV 21/4 in Cambodia in a fisherman’s village
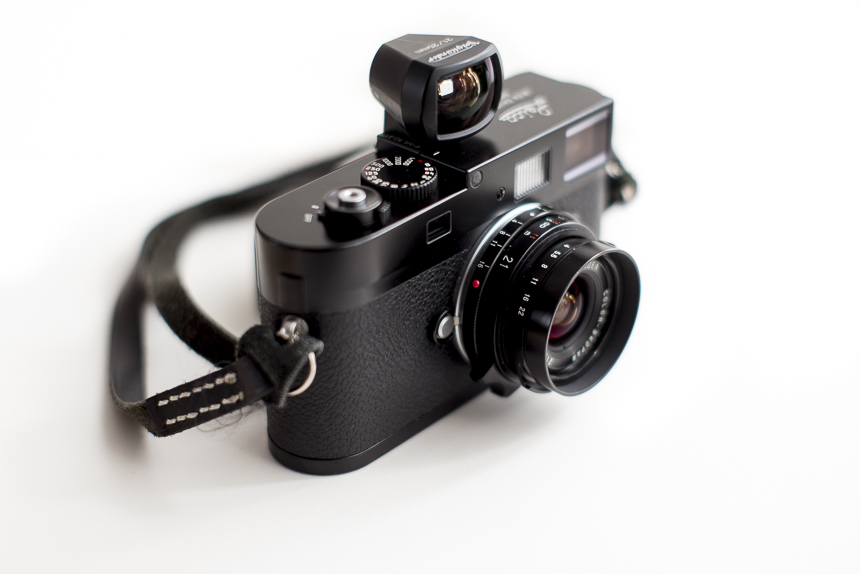
When I started looking for a 21mm I knew I would’t use it much and it had to be very light. I owned the Leica 24/2.8 Elmarit before, but I thought it was way too big and heavy for what I needed. Also, the difference between the 28 and 24 wasn’t big enough to justify taking an extra lens. Finally, I knew from my experience as an outdoor sports shooter that a 21 could deliver some interesting perspectives and in the outdoors, weight is priority number one. The little Voigtländer had some good reviews and was so cheap that I decided to give it a try. When I unboxed the lens at the Leica Boutique in Lisse – I bought most of my lenses there – I was surprised how small and light the lens was. With eight lenses in six groups it weighs only 136 grams and is so tiny that is truly deserves the name ‘pancake’. Since this is the newest version with a bajonet, there is no need for adapters. With a 21mm you’ll need an external viewfinder, unless you want to guess your framing. Voigtländer makes a nice lightweight plastic viewfinder that is a lot brighter than the viewfinder in the M. It doubles as a viewfinder for the 25mm lens, also produced by Voigtländer.
Perfect for street shooting where you want to include lots of the surroundingsAnd a crop to show the sharpness. Note the dark frames of the boat against the sky: there is almost no purple fringing, unlike in fast lenses.
Build quality and ergonomics
Although the CV 21/4 is tiny, it is sturdy as well. It comes with a little screw on hood that doesn’t make sense. You can buy a better one, or avoid shooting against the sun. It does flare heavily, so be prepared. One of the ergonomical drawbacks of a tiny lens is that you’ll have to support your camera, in stead of your lens, with your left hand. Also, you have to be very careful not to have any fingers in front of the lens. If I use this lens when I’m in a hurry, it sometimes happens that I have some fingers included in my shots, just because the lens is so tiny. Another drawback is the delay between focussing and framing. For critical focus, you’ll have to use the rangefinder patch in your viewfinder, but for framing, you’ll need the external viewfinder. With a 21mm however, especially with a slow 21mm, focussing is never as critical as with a faster and longer lens. If you’re into zone focussing and shooting from the hip, you’ll love this lens. It is so easy to get everything in acceptable focus from close up to infinity. Closest focussing is 0.5 meters, but you’ll need to guess focus for that, or use it with live view on the Leica M240, since the rangefinder on the M only focusses to 0.7 meters.
According to Ken Rockwell, the CV 21 is ‘awful’ on the M9…
Sharpness, bokeh and rendering
I don’t shoot brick walls to compare sharpness and distortion. But here’s what I found with my copy. I was surprised with the little distortion the 21 showed. I have seen lenses doing worse with regards to that. Sharpness is excellent. As you can see in the pictures above. It is sharp from corner to corner and corner sharpness increases when you stop it down to 5.6/8. Ken Rockwell, although not a fan of using this lens on the M9, compared the CV21 to the Leica 21/2.8 and found the cheap 21 to be sharper in the centre than the Leica. Rendering is nice, a bit classical, but not soft at all. The CV 21 is quite prone to heavy flaring, also due to the hood that doesn’t do much. But even when shot against the sun, the lens delivers sharpness and contrast.
When shot against the sun, the CV 21/4 flares heavily……but still delivers sharpness and contrast.
As far as bokeh goes with a 21/4 lens, the short minimal focussing distance makes it possible to get a little bit of depth of field in the image. As you can see, bokeh is nice, but nothing special. You don’t buy this lens for bokeh though.
Bokeh on a 21/4 lens? Yes, with a 0.5m focussing distance, there is some…
Problems
One of the reasons not to buy a 21mm for a Leica M is the fact that images will suffer from cyan corners and heavy vignetting. According to Ken Rockwell, the CV 21 is ‘awful’ on the M9. Well, I’ve heard him say other weird things about Voigtländer, so I didn’t care. Cornerfix could take care of this problem, so I read. It turned out there was an even better solution: manual coding on the camera itself. The CV 21/4 is not the only lens that suffers from heavy vignetting and cyan corners. The Leica 21/2.8 suffers from the same problem, so Leica created a clever in-camera solution. As you know, new lenses are coded to compensate for lens errors. I don’t like this option, because sometimes I want to use the natural vignetting of a lens, just because I like it. The cyan corners aren’t likable at all, so Leica did a good job to create a profile for this lens. By setting the lens detection to ‘manual’ and by selecting the 21/2.8 11134 lens in the menu, you get rid of the problem in the M9. You could also have the CV21/4 coded on the lens itself and set the camera to ‘automatic’ lens detection. The problem with manual coding is that you have to remember to switch the lens detection off, after changing your lens. If you forget, you’ll end up with the opposite of vignetting: light corners and the opposite of cyan: green/blueish corners. Absolutely terrible, and you can’t fix it.
Does it get any better? A full frame, all black, lightweight camera. Perfect for street photography
Conclusion
If you’re in for a small, light, sharp and cheap wide angle for your rangefinder: this is your lens. I can only think of one reason why you shouldn’t buy this lens and that’s the speed. As you know, f4 isn’t fast. In fact, it is unbelievably slow. For indoors, you’ll either need high ISO, or a tripod. Voigtländer also makes a fantastic 21/1.8 lens. I might get one in the future to give it a try.
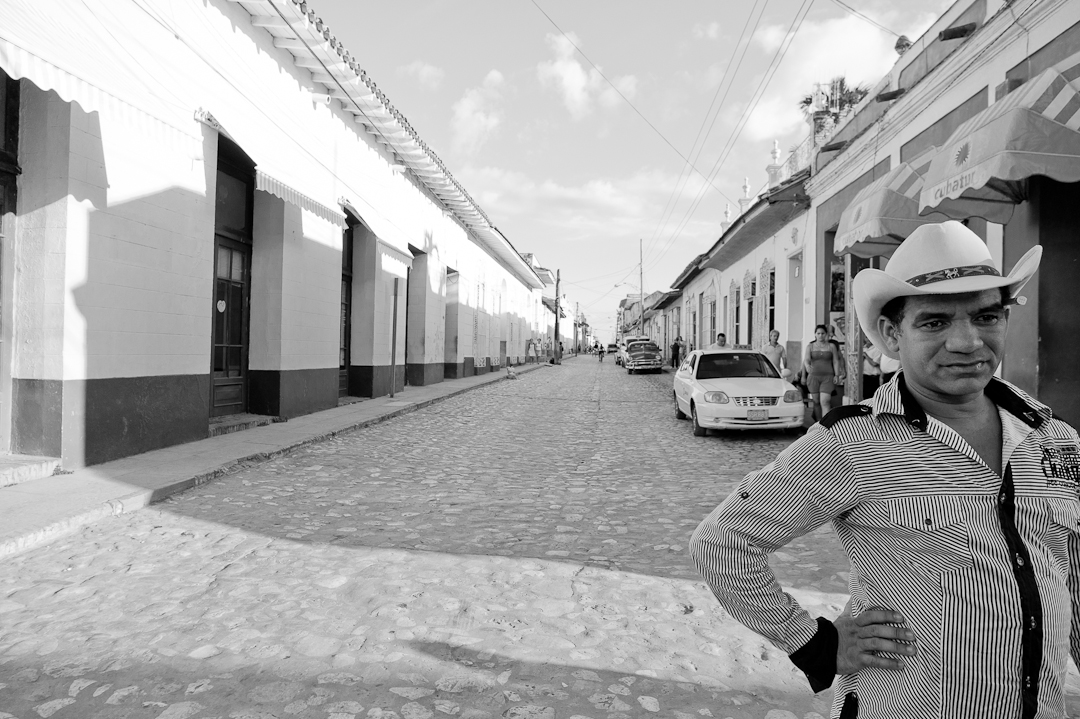
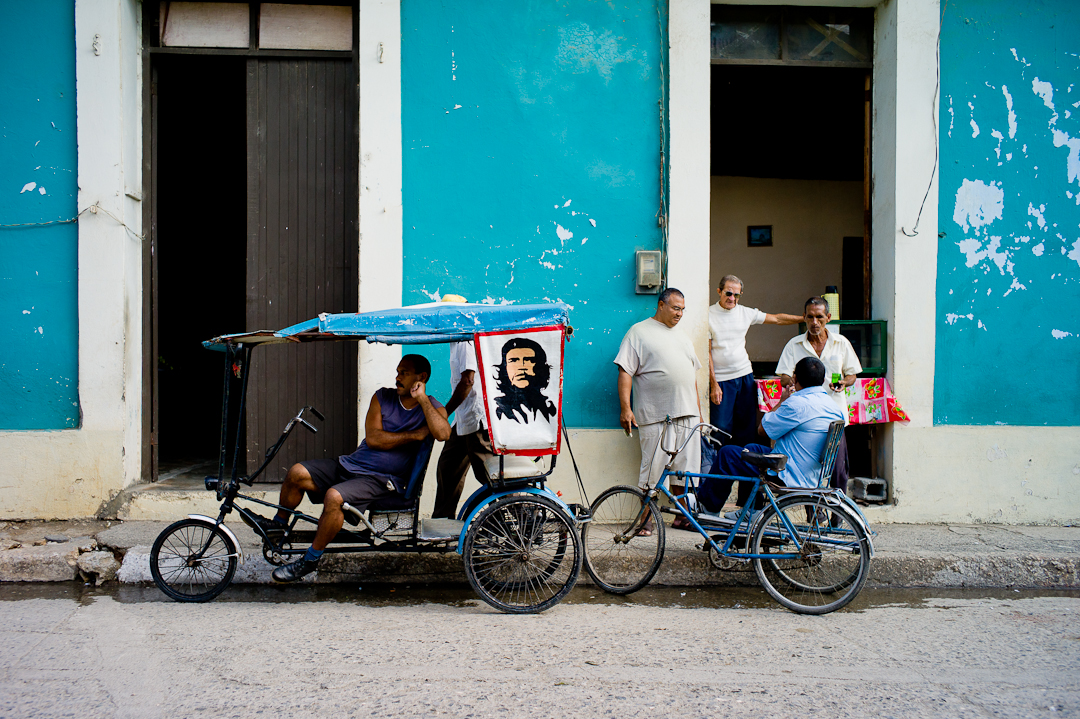
Cuba is a wonderful country for street photographers. I’d say, Havanna is the most interesting, also because the people that live here have gotten used to photographers. In smaller cities you’ll get stared at quite a lot. Here, in Holguin, you’ll have to use another tactic to get the snapshots you want. In this case, I noticed this nice scene on the streets, prefocussed my 50 cron on the houses on the opposite side of the street, walked along the scene while keeping the same distance, raised my camera and hit the shutter.
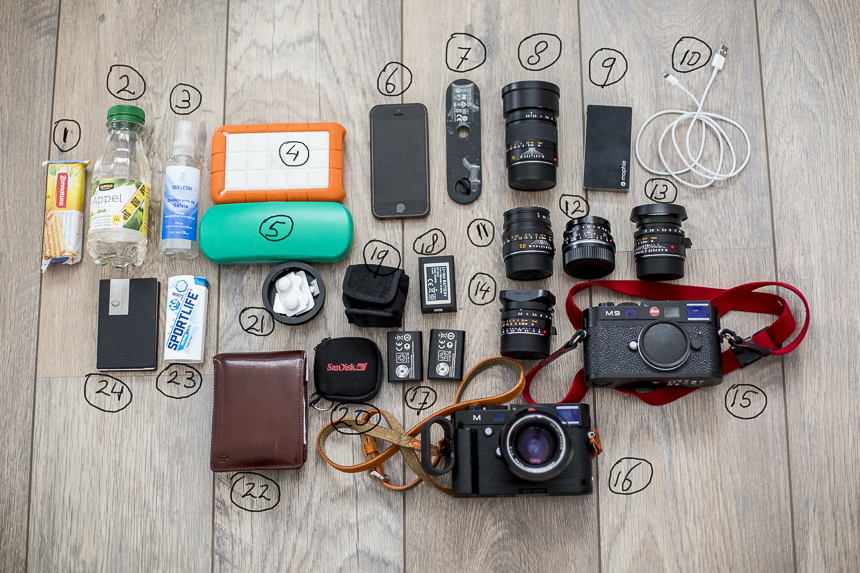
Many people have asked me what I take in my wedding bag. Well, I have some variation in what I pack. For longer days, I pack some extra food and an extra shirt. For weddings in winter, I take more fast lenses. In general, this is what my bag looks like on a typical wedding in summer. I try to keep it as light as possible, but sometimes ease of use is more important than weight. My Billingham bag for example, is not the lightest, but it is sturdy, has no velcro and it looks distinguished.
Sesame crackers: in general, my clients take care of my food, but sometimes I don’t have time for the regular food and these crackers provide fast energy and are also full of proteins.
A small bottle of water: again, drinks are also arranged for me, but sometimes I just need a fast sip of water.
Deodorant: well, you get the point.
Lacie rugged harddrive: I keep backups of my work, but for all the work that has not been delivered to clients, I carry an extra physical harddrive everywhere I go. Storing that work in the cloud is no option. There is simply too much data for that.
Glasses: I wear contacts during the day, but on my way home in the car, I prefer glasses. Besides that, if my contacts cause any problems, I can change quickly to my glasses.
iPhone 5S: The backbone of my company. Emails, contracts, information, satnav, it’s all there.
Bottom plate for M240: I have a hand grip for my M240, but I carry the original bottom plate with me, in case I drop the grip during battery change.
Leica 75 Summarit: My longest lens for a wedding. I also have a 90mm, but I rarely use that one. The 75 gives me a little extra reach, compared to the 50 and it is very light and very sharp. It is only half a stop slower than the much heavier 75 summicron.
Mophie powerstation mini: I can charge my iPhone 1.5 times with this neat little battery.
iPhone cable: for charging…
Leica 50 summicron: I shoot 50% of my wedding shots with this lens. It’s light, compact, sharp, has lots of microcontrast, flares when I want it to flare and I can use this lens with my eyes closed.
Voigtländer 21/4: Anyone that says that Voigtländer delivers sub-par quality should check it out: it is so sharp. I rarely use this one for weddings though. It is too wide for me, but sometimes I need it for a group portrait.
Leica 35 summicron ASPH: I use this lens for 40% of my shots. It is light-ish-, compact, sharp, has a good bokeh and I’m used to it.
Leica 28 elmarit: When the 35 isn’t wide enough, I use this lens. Not too often though. It is sharp en very light.
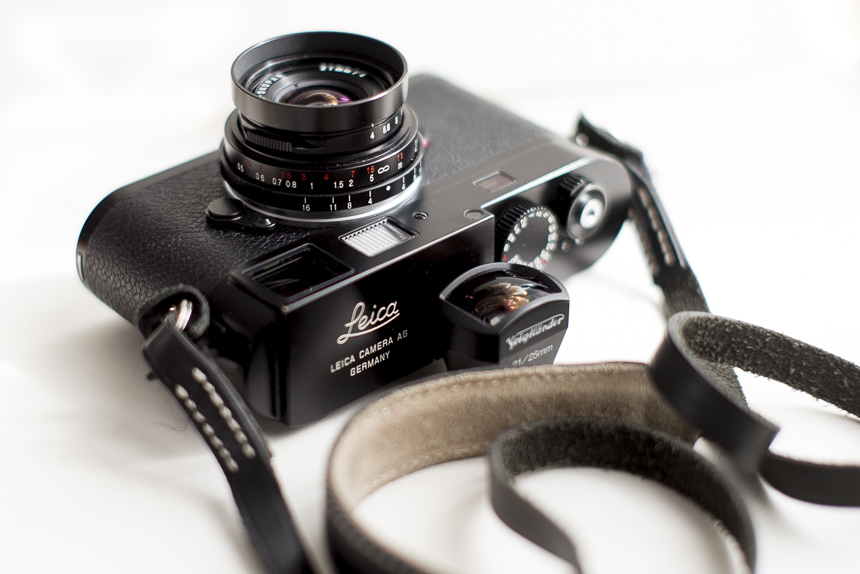
Leica M9: When I bought my M240, I could only buy one, because getting one was hard enough. They simply weren’t available. Before that, I used to work with two M9s, so with the M240, I had to get used to single body shooting again. When the availability of the M240 improved, I’d become used to working with one camera, so I kept my M9 as a backup. I might change it again in the future though. Sometimes, working with two bodies is better, sometimes one is better. It depends. Maybe an interesting topic for another article.
Leica M240 with hand grip, finger loop and CV 35/1.2: Well, the M240 has become my main camera and I do prefer it to the M9 as a professional. As a photographer, I also still like the CCD of the M9 at base ISO. The nokton is one heavy beast, but I absolutely need it in low light. In winter, I shoot 95% of my images with this guy.
Extra batteries for the M9: The M9 is a hungry animal. You’ll need three batteries for a full day of shooting.
Extra battery for the M240: In general, one battery will get you through the day, but for long days (12 plus hours) an extra one is good to have.
EVF2: Live view is far from perfect in the M240. Mainly due to shutter lag and blackout. For slow work in dim light, it can work though.
SD cards: I carry 4x 16Gb for a long day. I rarely need more than two.
The pills: Some pain killers and antihistaminics will get me through the day, if needed.
Wallet: some cash, cards and other stuff that I need.
Sportlife mints: well, you get that as well.
Business cards: Because people want them.
I have more lenses and cameras, but this is the kit I can rely on. I have shot so many weddings with my 35 and 50 crons that I can use them with muscle memory. The CV 35/1.2 doubles as a lens for low light and as a backup for my 35 cron. Sometimes I take a faster 50mm for the same reason. It all depends on the situation.
Last, but not least the bag: The Billingham 225 is one of the best bags I have ever had. It looks great, is very sturdy, is not too deep for the small rangefinder lenses and cameras and it holds everything I need on a long wedding day. One more thing: I always carry a lens cloth in my jacket or pants. The best ones are the ones that are used a lot.
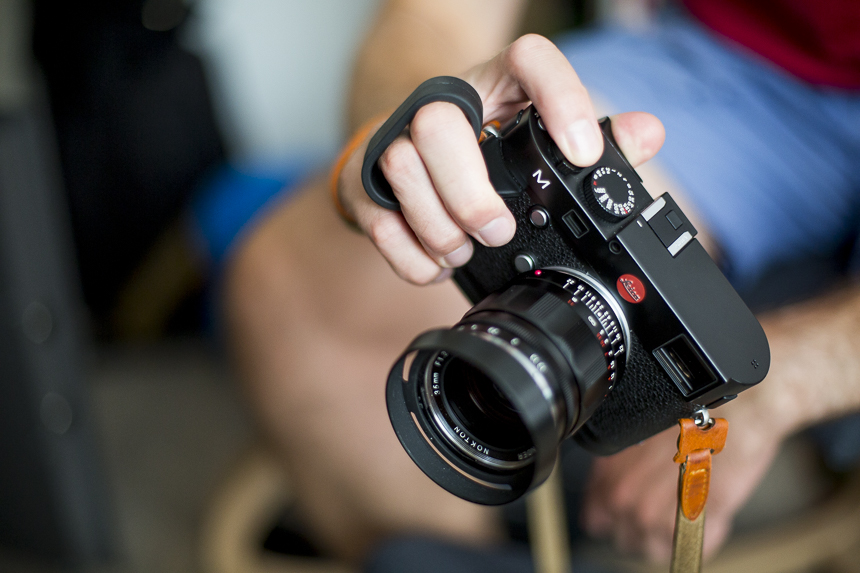
I wasn’t sure about the Leica M240 finger loop. To me, the handgrip doesn’t make the camera prettier or less obtrusive. Adding another ‘thing’ to the camera might seem not the smartest thing to do with an elegant camera like the Leica M240. But for me, the M is my workhorse. And if something adds stability, or makes the camera easier to handle, I’ll be happy to try it. I liked – and still like – the handgrip, so I ordered the finger loop and attached it to the grip, just one day before a long day of shooting.
Sizing
But first things first: my hands are average to slightly large in size. My North Face glove size is L. My Icebreaker gloves are size L. I used to have some Gore-Tex climbing gloves in size 9. However, it’s the thickness of your fingers that matters. You’ll use your ring and middle finger for the loop, so these are the ones that have to fit. If I pull these two fingers together, they measure almost 4cm in width together, at the thickest point. Height wise, both fingers are almost the same and measure a little more than 2cm. For me, size M is large enough to fit my fingers in fast and easy, but still provides enough support to use the loop.
With the loop there is less need to ‘squeeze’ the camera to get it steady…
Leica M240 finger loop in the field
The first day I didn’t like the loop at all. It started to hurt after a few hours and I found it hard to get my fingers in, when I needed to take a very quick shot. I took it off and decided to sell it again. However, a few days later I tried it again and this time I started to like it. For some reason it didn’t hurt at all and I only took my fingers out, when I changed lenses. With the loop there is less need to ‘squeeze’ the camera to get it steady, especially with heavy lenses. You can just let it hang from your fingers and it works great. When not using the camera, you can let it hang from your fingers vertically and relax your hands and fingers. When taking shots in portrait mode, the ‘letting it hang’ works even better, but here’s something you’ll need to know before you buy one of your own. The first few shots I took in portrait mode were a bit of a confusion. I couldn’t get my image in focus and – annoyed- I turned the camera in landscape mode and focussed again. Instantly, I knew what happened. My fingers were in front of the window that works with the rangefinder mechanism. My fingers were so relaxed that I covered the second most important window of the camera. During that day, I had to remember where to put my fingers during portrait shots. A little inconvenient, but you’ll get used to it.
Conclusion
Would I recommend the Leica M240 finger loop? Well, if you use heavy lenses and use the camera for hours and hours: yes, absolutely. If you use light lenses, carry your camera mostly on a shoulder strap and don’t want to ruin the good looks of your camera: maybe not.
Yesterday I read an article about high ISO photography and the quality of light. The author stated that with really bad and low light, it wasn’t always worth it taking a picture, because the technical quality of the picture wouldn’t be good enough. Instead he offered the readers his solution of using LED-light to brighten up the scene.
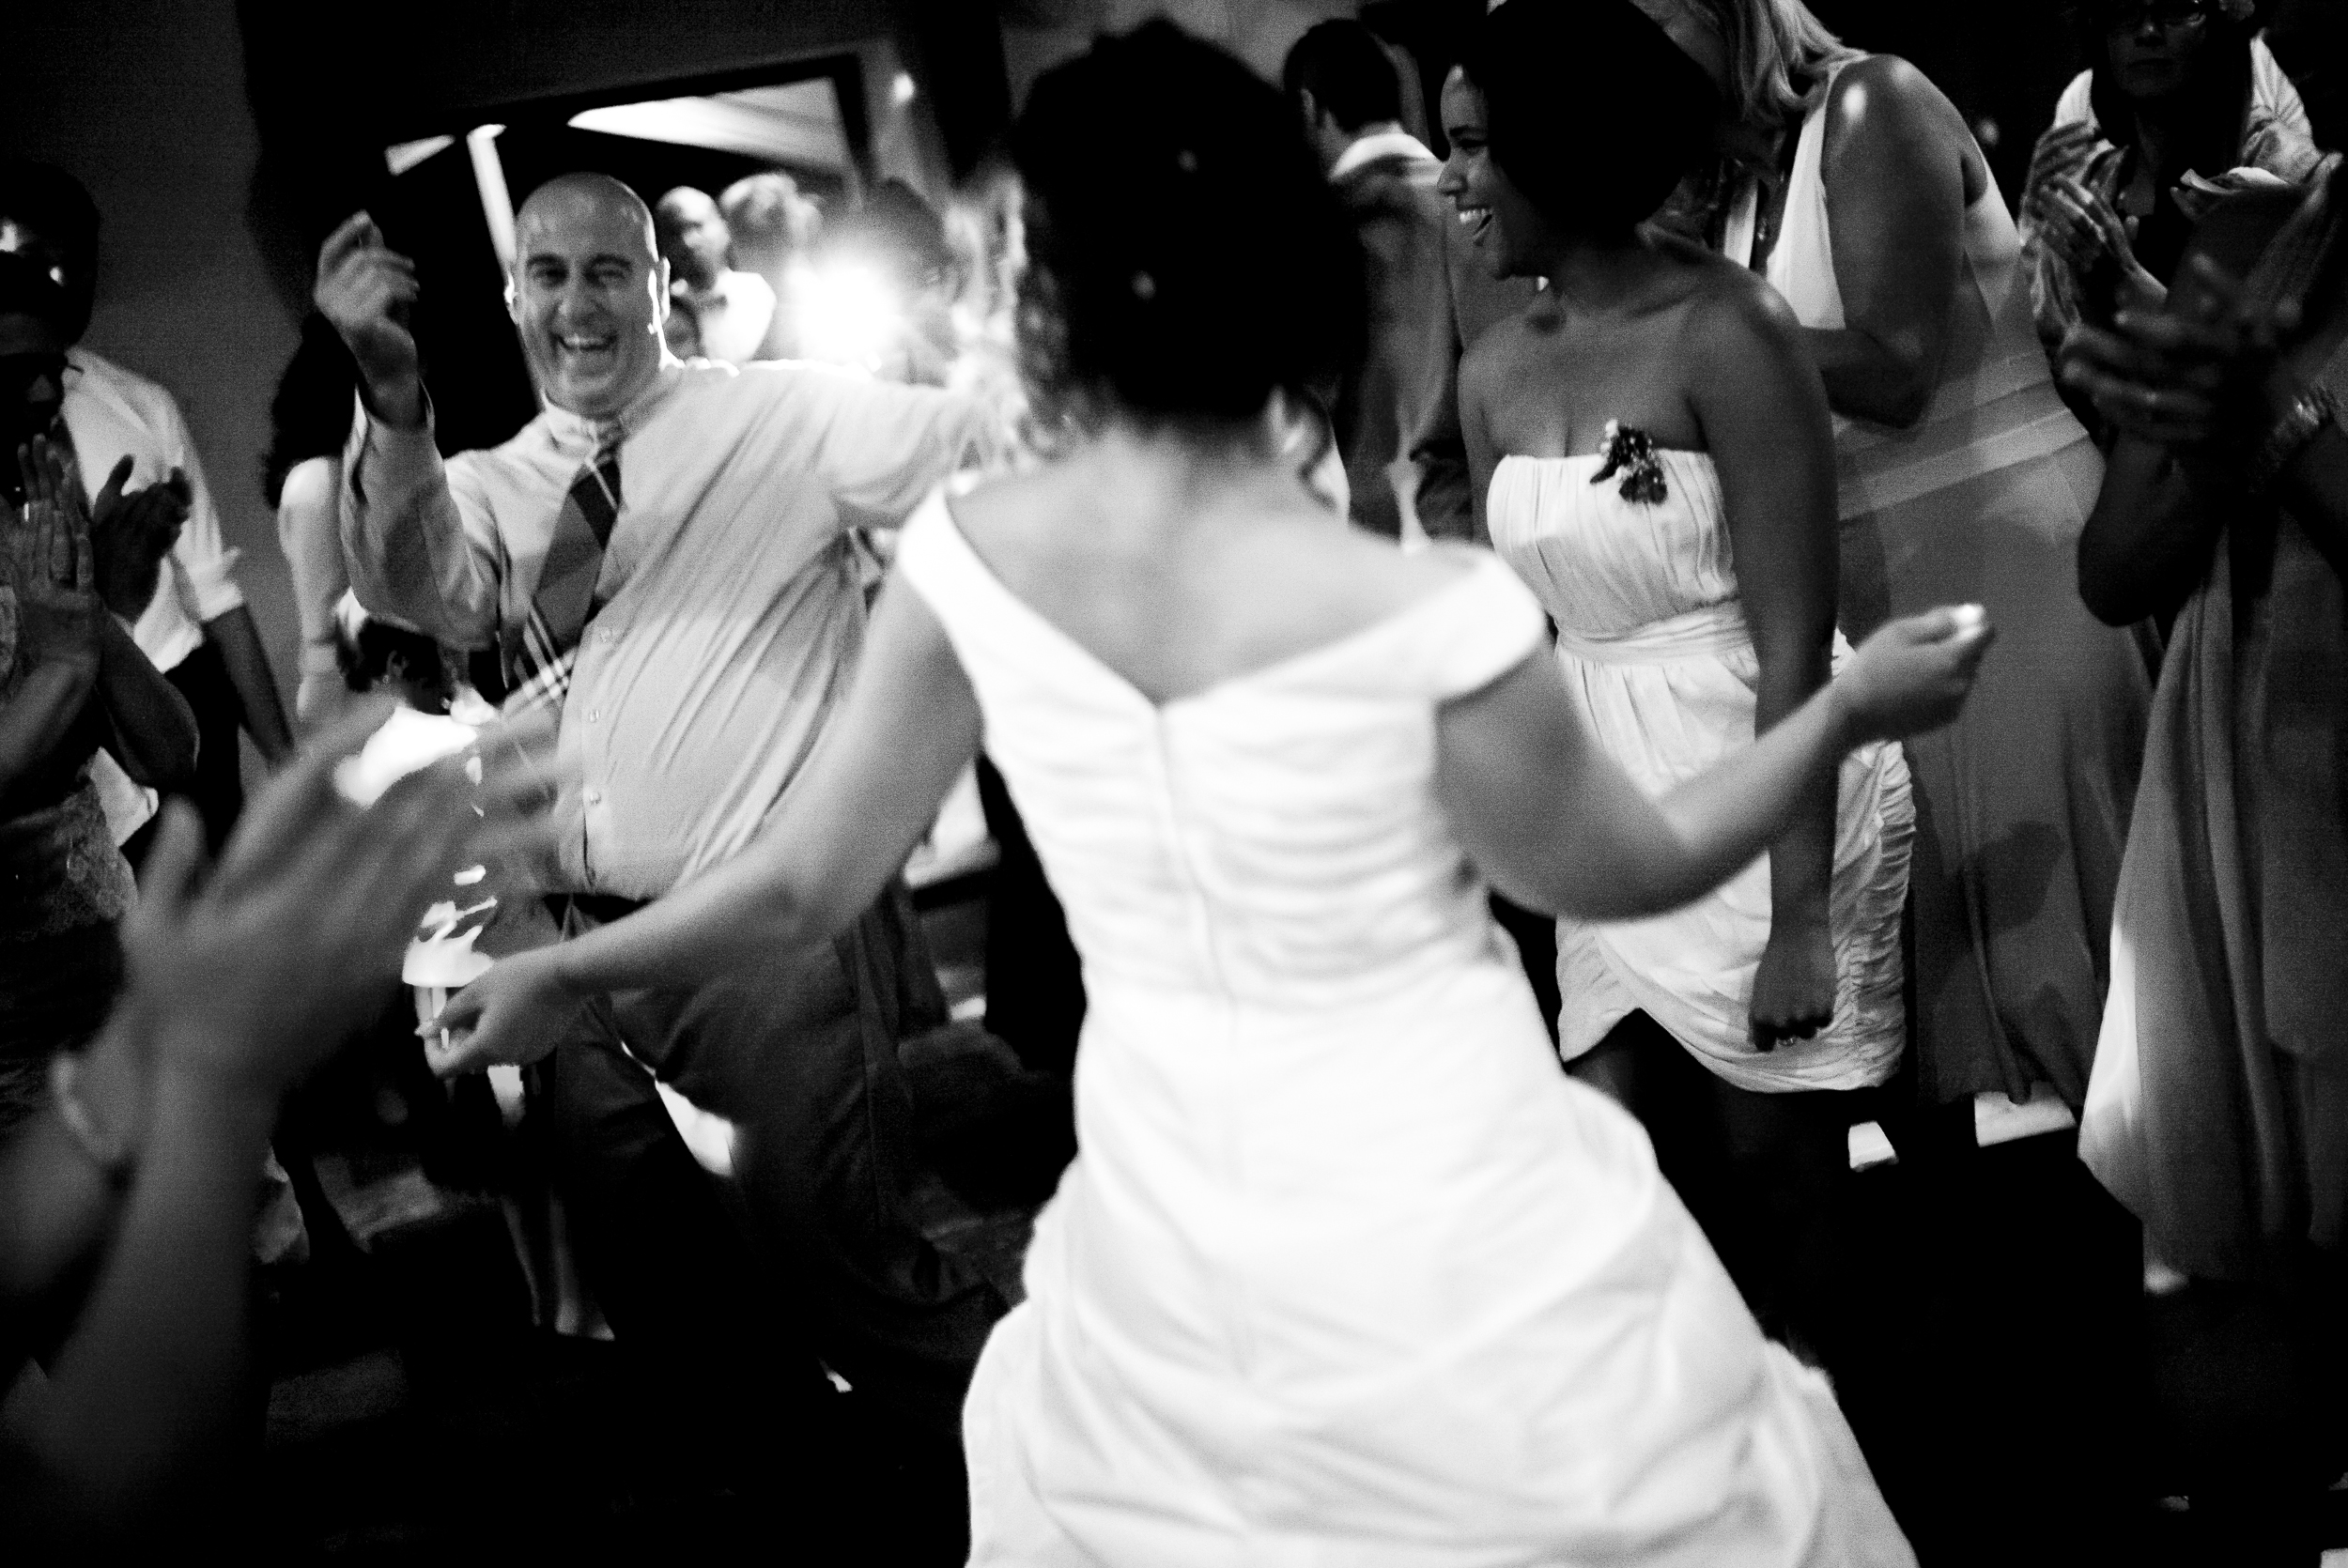
To me, a documentary wedding photographer, technical quality is less important than emotional impact. If the impact is there, the picture is worth taken. And the other way round: a technically perfect image, without emotional impact is not interesting to me at all. Cartier-Bresson said: Sharpness is a bourgeois concept. And in some way, he was right. Sometimes you do need sharpness, but sharpness and other technical qualities aren’t the most important things in a picture. I have to shoot in circumstances where most photographers would either use flash, or put their camera away. With the M9 I shot first dances at 2500 ISO, at 1.2 at 1/8th of a second. Of course these images weren’t sharp, but they conveyed the message. If I would have thrown in a big flashgun I wouldn’t have been able to shoot it in my unobtrusive way, but I would have destroyed the atmosphere as well. Now, with the M240 I can pump up the ISO to 6400 ISO and that gives me shorter shutter speeds, but I still need my 1.2 and sometimes I can’t shoot faster than 1/60th of a second. With people moving around, these won’t give you razor sharpness as well, but honestly, I love the way the images turn out. They’re grainy, but full of emotion and they show how the light was.
The picture that I attached to this blog was shot at 1.2 at 1/125th of a second at 3200 ISO. No, it isn’t sharp, but you may ask the bride if this picture was worth taking. I think you already know the answer.
The world is small and fast, because only an hour after posting this blog on Facebook, the author contacted me through Facebook and we had an interesting conversation about ambient light, flashguns and LED. Of course he didn’t mean that the things he stated in his article were true for all situations. Sometimes, for example during documentary wedding photography, you just need to work with the dim light and make the best of it. It turned out that the author doesn’t use flash or LED for 99% of the time. He even made some changes to his article. Thanks for doing so! The fact is, I know there are a lot of people that will still say that they’ll throw away pictures because they’re not sharp. If all photographers would have taken that advice, we wouldn’t have had Capa’s pictures of D-Day and many, many, many other great pictures that won many prices.
I’m a big fan of the various thumbs-up thumb rests. I’ve been using these things on my M9 and M9-P for a couple of years now and they truly add stability and ergonomics to these cameras. Being a documentary wedding shooter, I sometimes have to use very slow shutter speeds. With the M9, shooting on 1/8th of a second, on 1.2 at 2500 ISO was as far as I could go. You can imagine how thrilled I was with the extra two stops of the M240. I could use two more stops of course, but this is getting us somewhere.
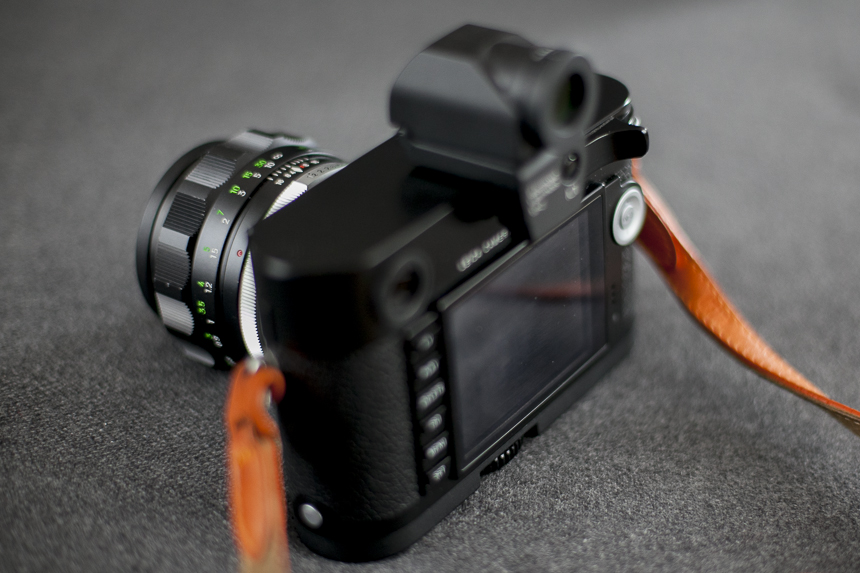
With the M240, I just used the same Thumbs-up that I used on the M9. It worked perfectly, but having to slide the thing out when I wanted to use the accessory port, started to annoy me after a while. At first, I wasn’t interested in live view at all, until I discovered that I could use a lot of interesting lenses on my M with a simple adapter. My old manual focus Minolta lens kit got a second life. I even bought an electronic viewfinder and after getting used to it, I took it to some weddings as well. For fast action, the EVF is unsuitable, due to a lag and a very annoying long blackout. But when I’m shooting a reception and I have some time left to do some ‘free shooting’, I do like to use my 58/1.2 and get some creamy bokeh shots.
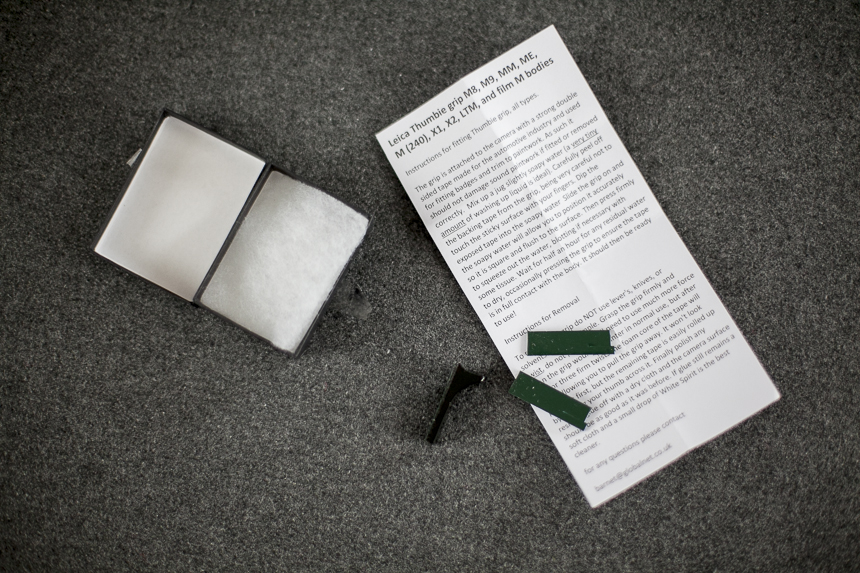
After almost losing my Thumbs-up, because I kept changing between the EVF and the thumbs-up, I ordered the Thumbie to give it a try. I must say I wasn’t really keen on glueing something to my camera, but after I read that removing the Thumbie is even easier than attaching it, I just went for it. With even less than 30 euros, the Thumbie is quite cheap. I’d be happy to pay almost double for it, but a bargain is always welcome. It was shipped fast and was delivered in a nice little box with clear instructions and two extra tape pads. Attaching the Thumbie took just half an hour and during this time, I managed to edit at least ten pictures. After attaching the Thumbie I needed to press it a few times to make it stick to the body, as instructed. After that, it felt quite solid, with just a little flex, due to the foam. Although a bit cautious first, I started to hold my camera like I did with the Thumbs-up quite quickly. The Thumbie gives a little less support compared to my Thumbs-up, but more than enough to improve the ergonomics dramatically.
Subtle but effective: the Thumbie improves the ergonomics of your M240
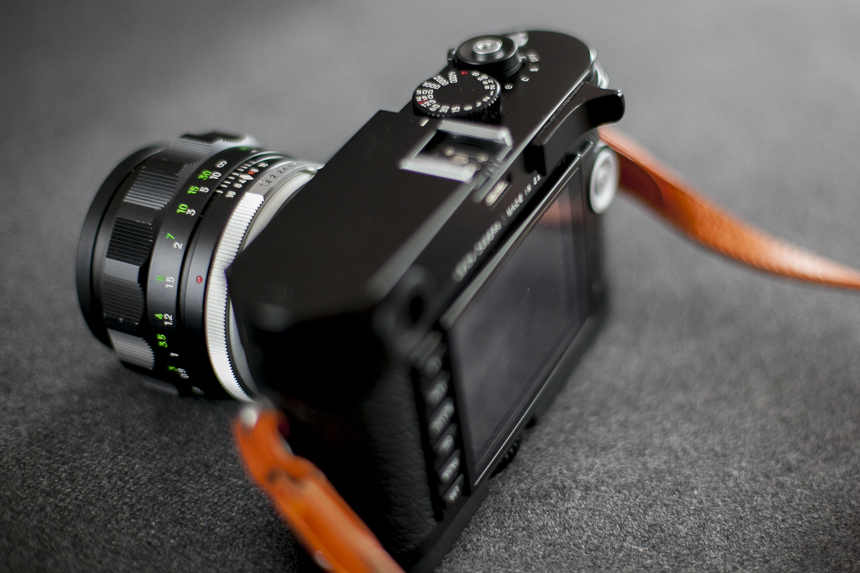
After a few weddings and other assignments I can say I’m very, very pleased with the Thumbie. It leaves my accessory port open, improves the ergonomics and it looks nice. Anyone looking for an improvement of the M240 ergonomics should definitely consider this little gem. Users of the M9 and M8 that are in the market for improvement of the ergonomics of their camera might also consider the Thumbie. However, if you never use your hotshoe and you don’t mind spending a little extra money, I’d recommend the Thubs-Up EP-1S. It has just a tiny bit more grip for your thumb and you can easily remove it if you don’t want it on your camera.
Hey, a thumb rest AND the EVF on your camera at the same time. Can’t do that with the Thumbs-up…